
Decision Table Testing
Handling Complex Business Logic

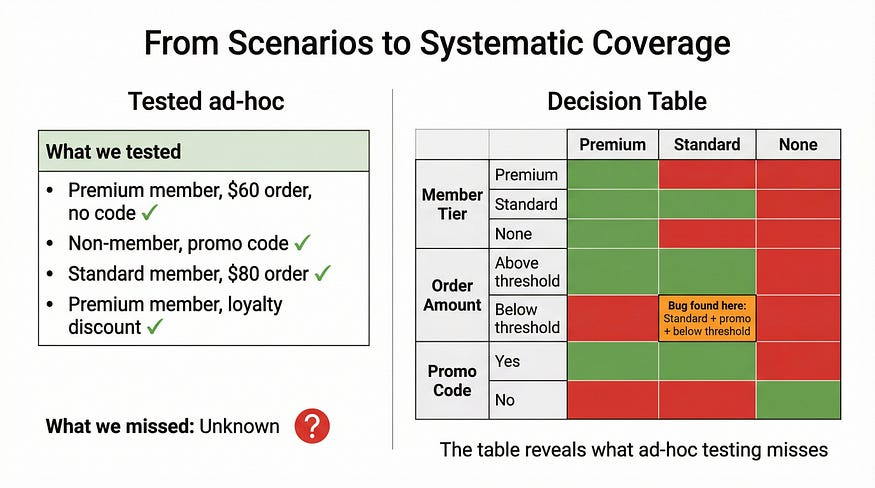
The requirements document said: Premium members get free shipping on orders over $50. Standard members get free shipping on orders over $75. Non-members never get free shipping, unless they have a promotional code. Promotional codes apply to all member tiers but do not stack with loyalty discounts. Loyalty discounts apply automatically to premium members with more than 12 months of membership.
The developer read it three times. Built something. Tested it with a premium member, a $60 order, no promo code. Worked fine.
The tester ran through it with a few scenarios. Non-member with promo code — worked. Standard member, $80 order — free shipping applied. Good enough.
Six weeks after launch, a customer service report came in: standard members with promotional codes on orders between $50-$74 were getting free shipping. The condition for promotional codes overrode the standard member threshold without anyone realizing it was even a combination worth testing.
Nobody had drawn the table.
When business logic involves multiple conditions that interact with each other, the combinations multiply faster than intuition can track. Two conditions with two states each gives you four combinations. Three conditions gives you eight. Four conditions: sixteen. Five: thirty-two. At some point, the human brain stops being able to hold all of it at once — and that’s exactly where the bugs hide.
Decision table testing is the technique for this problem. It forces you to enumerate every meaningful combination of conditions and specify the expected outcome for each one. The table becomes your map of the logic space. If you’ve covered every column, you’ve tested every case. If the system doesn’t match the table, you’ve found a bug. If the table doesn’t match the requirements, you’ve found a requirements gap before a line of code was written.
This article builds directly on the equivalence partitioning and boundary value analysis techniques from our previous two articles. Where those techniques dealt with what values to use as inputs, decision tables address a different question: which combinations of conditions need to be tested. They’re complementary — in a thorough test suite, you’ll use both.
What a Decision Table Actually Is
The structure is simple even when the logic isn’t. A decision table has four regions:
Conditions occupy the top rows — these are the inputs or factors that influence the outcome. Each condition can take different states: yes/no, true/false, tier A/B/C, above/below threshold.
Actions occupy the bottom rows — these are the outcomes or behaviors that result from each combination of conditions.
Condition entries fill in the body of the upper section. Each column represents one combination of condition states.
Action entries complete the lower section — for each combination of conditions, what should happen?
Here’s the shipping logic from our opening, formalized. Notice that the original two-state “Premium member: Y/N” has been corrected to three tiers — collapsing Standard and Non-member into a single “N” was what created the original bug, because those two groups behave differently when no promo code is present. The “Order over tier threshold” condition uses a dash for non-members because they never qualify for threshold-based free shipping regardless of order size — only a promo code changes their outcome.
╔════════════════════════════════╦══╦══╦══╦══╦══╦══╦══╦══╦══╦══╦══╦══╗
║ CONDITIONS                     ║ 1║ 2║ 3║ 4║ 5║ 6║ 7║ 8║ 9║10║11║12║
╠════════════════════════════════╬══╬══╬══╬══╬══╬══╬══╬══╬══╬══╬══╬══╣
║ Member tier (P/S/N)            ║ P║ P║ P║ P║ S║ S║ S║ S║ N║ N║ N║ N║
║ Order over tier threshold?     ║ Y║ Y║ N║ N║ Y║ Y║ N║ N║ -║ -║ -║ -║
║ Promotional code present?      ║ Y║ N║ Y║ N║ Y║ N║ Y║ N║ Y║ N║ Y║ N║
╠════════════════════════════════╬══╬══╬══╬══╬══╬══╬══╬══╬══╬══╬══╬══╣
║ ACTIONS                        ║  ║  ║  ║  ║  ║  ║  ║  ║  ║  ║  ║  ║
╠════════════════════════════════╬══╬══╬══╬══╬══╬══╬══╬══╬══╬══╬══╬══╣
║ Apply free shipping            ║ Y║ Y║ Y║ N║ Y║ Y║ Y║ N║ Y║ N║ Y║ N║
║ Apply loyalty discount check   ║ Y║ Y║ N║ N║ N║ N║ N║ N║ N║ N║ N║ N║
╚════════════════════════════════╩══╩══╩══╩══╩══╩══╩══╩══╩══╩══╩══╩══╝
A few things worth noting in this table:
Columns 9 and 11 (non-member, with promo code) both result in free shipping regardless of order size — which is why the threshold condition is a don’t-care for non-members. The promo code is the only path to free shipping for them, and it applies unconditionally.
Columns 10 and 12 (non-member, no promo code) never get free shipping — again, order size is irrelevant.
Loyalty discount check only applies to premium members who qualify by tenure, so it only appears in columns 1–4. Even then, columns 3 and 4 (premium, below threshold) require a promo code or no discount scenario where the loyalty check is still needed for column 3 — worth flagging to the product team whether a promo code and loyalty discount can coexist.
That last point is a requirements gap this table just surfaced. Column 1: premium member, over threshold, promo code present, loyalty discount eligible. Do they stack? The spec says they don’t — but what actually happens? Does the loyalty discount take precedence? Does the promo code? The developer will have to decide, and whatever they decide becomes undocumented behavior.
Building the Table Step by Step
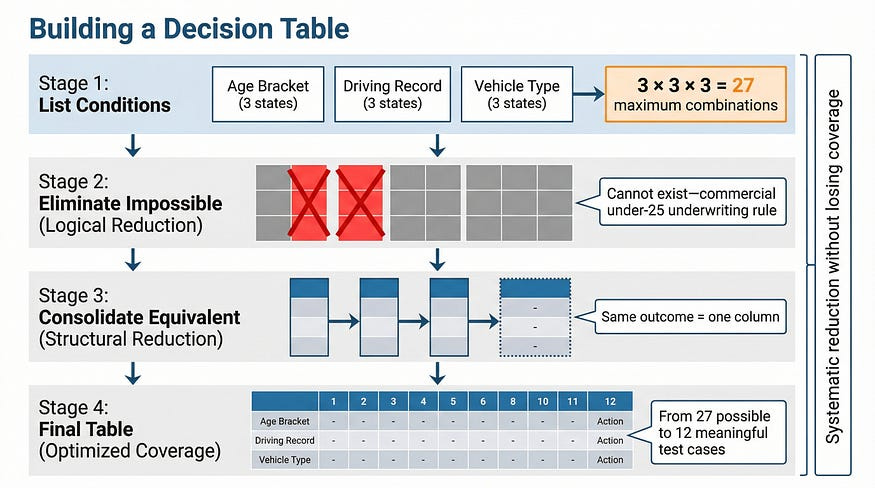
Step 1: Identify the conditions. List every independent factor that influences the outcome. “Independent” matters here — if knowing one condition’s value tells you another condition’s value, they may need to be restructured. For our insurance premium example: age bracket (Under 25 / 25–65 / Over 65), driving record (Clean / Minor violations / Major violations), and vehicle type (Standard / Luxury / Commercial).
Step 2: Calculate maximum combinations. With three conditions at 3, 3, and 3 states respectively, the theoretical maximum is 3 × 3 × 3 = 27 combinations. This is your starting point, not your final table.
Step 3: Eliminate impossible combinations. Some columns represent states that can’t co-occur. A commercial vehicle policy for a driver under 25 may be rejected outright under the insurer’s underwriting rules — it’s not a valid scenario, so testing it is meaningless. Remove those columns and document why.
Step 4: Consolidate equivalent combinations. Where multiple combinations produce the same outcome for the same reasons, they can be merged using “don’t care” notation (written as -). A clean driving record with a standard vehicle produces the base rate regardless of age bracket — those three columns become one.
Step 5: Verify the table against requirements. Walk each column against the spec. Every column should trace to at least one requirement. Any column you can’t trace is either an implicit requirement that needs to be made explicit, or a combination the spec doesn’t address — which means the developer will be guessing.
The Don’t Care Notation
When a condition’s value doesn’t affect the outcome for a given column, “don’t care” notation (typically -) signals that it can be any valid state. This is what enables table consolidation — but applying it incorrectly creates hidden coverage gaps, so it needs to be used deliberately.
The ATM withdrawal flow is a good example, because it also illustrates how real-world business rules add nuance. Most ATMs allow up to three PIN attempts before retaining the card as a fraud prevention measure. After a third failed attempt, the card is kept. After one or two failed attempts, the card is returned so the customer can try again. Insufficient balance is a different matter entirely — the customer authenticated successfully, so the machine has no reason to keep their card. They just can’t withdraw that amount.
╔══════════════════════════════════════╦═══╦═══╦═══╦═══╦═══╗
║ CONDITIONS                           ║ 1 ║ 2 ║ 3 ║ 4 ║ 5 ║
╠══════════════════════════════════════╬═══╬═══╬═══╬═══╬═══╣
║ Card valid?                          ║ N ║ Y ║ Y ║ Y ║ Y ║
║ PIN correct?                         ║ - ║ N ║ N ║ Y ║ Y ║
║ 3rd failed PIN attempt?              ║ - ║ N ║ Y ║ - ║ - ║
║ Sufficient balance?                  ║ - ║ - ║ - ║ N ║ Y ║
╠══════════════════════════════════════╬═══╬═══╬═══╬═══╬═══╣
║ ACTIONS                              ║   ║   ║   ║   ║   ║
╠══════════════════════════════════════╬═══╬═══╬═══╬═══╬═══╣
║ Dispense cash                        ║ N ║ N ║ N ║ N ║ Y ║
║ Show error message                   ║ Y ║ Y ║ Y ║ Y ║ N ║
║ Return card to customer              ║ Y ║ Y ║ N ║ Y ║ Y ║
║ Retain card (fraud prevention)       ║ N ║ N ║ Y ║ N ║ N ║
╚══════════════════════════════════════╩═══╩═══╩═══╩═══╩═══╝
Walk through each column:
Column 1 — Invalid card: The machine can’t validate a PIN or check a balance for a card it doesn’t recognize. All three downstream conditions are don’t-cares. The card is returned (it belongs to someone, even if it’s not valid for this machine), and an error is shown.
Column 2 — Valid card, wrong PIN, not the third attempt: Error shown, card returned. The customer still has attempts remaining.
Column 3 — Valid card, wrong PIN, third failed attempt: Card retained as fraud prevention. Error shown. Balance is a don’t-care — you never reach balance checking when authentication fails.
Column 4 — Valid card, correct PIN, insufficient balance: Error shown, card returned. Authentication succeeded; the customer just can’t withdraw that specific amount. Retaining the card here would be wrong — they did nothing to trigger fraud prevention.
Column 5 — Full success path: Cash dispensed, card returned, no error.
The “3rd failed PIN attempt” condition is what makes this table honest. Without it, you’d have a simplified table that implies the ATM always returns the card on a wrong PIN — which isn’t how real ATMs work, and would miss the fraud prevention test case entirely.
This is a pattern worth internalizing: when a table seems too simple, it often means a real-world nuance hasn’t been captured as a condition yet.
When Decision Tables Find Requirements Problems
The most valuable moment in building a decision table often isn’t when you run the tests. It’s when you’re filling in the action rows and realize you don’t know what the expected outcome should be.
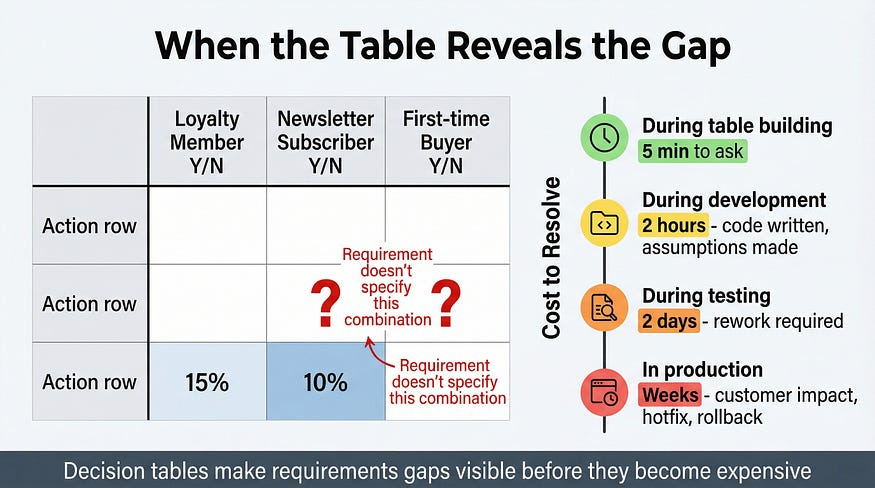
A product manager specifying a promotional discount system: loyalty members get 15% off, newsletter subscribers get 10% off, first-time buyers get 5% off. You start building the table. Column 4: loyalty member who is also a newsletter subscriber and is making their first purchase. What’s the discount?
The specification doesn’t say. Does the system stack discounts (30%)? Apply only the highest (15%)? Apply only the first applicable rule (depends on evaluation order in code)? The product manager assumed this combination was rare enough not to matter. It will happen regularly. First-time buyers frequently subscribe to newsletters before purchasing, and if they’ve been loyalty members from a previous account or a merged program, all three apply simultaneously.
The decision table surfaces this gap before a line of code is written — before a developer makes an assumption that becomes undocumented behavior, before a customer calls to ask why their expected discount wasn’t applied, before an A/B test produces inexplicable results because the discount logic isn’t consistent across user segments.
Build the table. Fill in every action cell. The blanks tell you where the requirements are incomplete.
Deriving Test Cases from the Table
Each column in a decision table is one test case. The conditions in that column define your inputs; the actions define your expected results. The mapping is direct.
For the ATM table:
Test Case 1 — Invalid Card
Setup: Obtain an expired or cancelled card
Input: Insert card, attempt to proceed
Expected: Error message displayed, card returned, no cash dispensed, card not retained
Test Case 2 — Valid Card, Wrong PIN (1st or 2nd attempt)
Setup: Valid card with known PIN
Input: Insert card, enter incorrect PIN
Expected: Error message displayed, card returned, another attempt offered
Test Case 3 — Valid Card, Wrong PIN (3rd attempt)
Setup: Valid card, two prior failed attempts already recorded (or use a test account configured for this state)
Input: Insert card, enter incorrect PIN for the third time
Expected: Error message displayed, card retained by machine, no further attempts offered
Test Case 4 — Valid Card, Correct PIN, Insufficient Balance
Setup: Valid card, known correct PIN, account balance of $20
Input: Insert card, enter correct PIN, request $100 withdrawal
Expected: Error message displayed, card returned to customer, no cash dispensed
Test Case 5 — Full Success Path
Setup: Valid card, known correct PIN, account balance of $200
Input: Insert card, enter correct PIN, request $100 withdrawal
Expected: $100 dispensed, card returned, balance updated to $100
Notice that test case 3 requires some thought about setup — you need an account in a specific state (two prior failed attempts within the lockout window). This is worth flagging: decision tables tell you what to test, but getting the system into the right state to test it is a separate challenge that belongs in your test setup documentation.
Handling Tables That Get Too Large
When conditions multiply, tables grow exponentially. A system with six binary conditions has a theoretical maximum of 64 columns. Six conditions with three states each: 729. At that scale, exhaustive decision tables become impractical — not because the technique fails, but because the problem has become too large for any single technique to handle alone.
Decompose the logic. Complex systems often contain nested decisions. The outer layer determines which rule set applies; the inner layers contain the rules themselves. Build separate tables for each layer. A payment processing system might have one table for “which payment path applies” and separate tables for each path’s validation logic. Each table stays manageable; together they cover the full system.
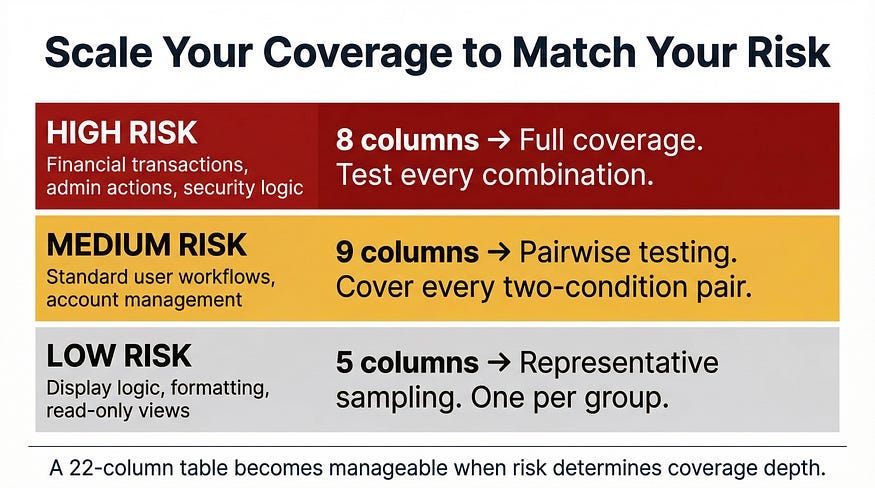
Risk-stratify the columns. Not every combination carries equal business risk. Identify which combinations involve high-value transactions, sensitive data, or states that are difficult to recover from — and prioritize those columns for testing. Lower-risk combinations can receive reduced coverage or be handled by other techniques.
Use pairwise testing for the remainder. Once high-risk combinations are explicitly covered, pairwise testing — covering every combination of any two conditions at least once — provides reasonable coverage of the remaining combinations without full enumeration. We’ll cover pairwise testing in its own dedicated article; for now, it’s worth knowing it exists as a complement to decision tables, not a replacement.
Decision Tables in the Age of AI-Generated Code
AI code generators are good at implementing straightforward logic. Give one a simple if-else requirement and it produces clean, functional code. But complex conditional logic with multiple interacting conditions is where the gaps appear. The AI implements what it can confidently infer from the requirement — usually the obvious cases. Multi-condition intersections, don’t-care nuances, and the combinations that only appear when you enumerate systematically are precisely what it’s most likely to handle inconsistently.
A development team recently used an AI assistant to implement eligibility logic for insurance claims — similar complexity to the examples in this article. The AI produced code that passed 80% of manually-written test cases. The 20% it missed were all multi-condition combinations: intersections between eligibility criteria that had been implemented in separate code branches without considering their interaction.
The decision table had been built before the AI was asked to write the code. Test cases were ready before the first line was generated. Gaps were visible immediately rather than discovered by end users.
This is the right workflow: specify completely (which building a decision table forces you to do), generate code, verify systematically (which the table’s test cases enable). Trusting AI-generated conditional logic without systematic verification is how multi-condition bugs survive to production.
What a Bad Table Looks Like
Most teams who try decision tables for the first time produce something that looks correct but isn’t. Here’s a real pattern — a table built for the same password reset feature we’ve been working with, submitted by a junior tester who thought they’d covered it.
The spec: If the account is active and email matches, send a reset link. If the account is locked, direct to support. If the email isn’t recognized, show a generic message for security reasons.
The table they submitted:
╔══════════════════════════════╦═══╦═══╦═══╗
║ CONDITIONS                   ║ 1 ║ 2 ║ 3 ║
╠══════════════════════════════╬═══╬═══╬═══╣
║ Account active?              ║ Y ║ N ║ N ║
║ Email matches?               ║ Y ║ Y ║ N ║
╠══════════════════════════════╬═══╬═══╬═══╣
║ Send reset link              ║ Y ║ N ║ N ║
║ Show contact-support message ║ N ║ Y ║ N ║
║ Show generic message         ║ N ║ N ║ Y ║
╚══════════════════════════════╩═══╩═══╩═══╝
Three columns. Looks clean. Has a column for each action. Most reviewers would sign off on this.
It has four problems.
Problem 1: “Account active: N” is doing double duty. The spec describes two distinct non-active states — locked accounts and non-existent accounts — and they produce different outcomes. Locked accounts go to support. Non-existent accounts get the generic message. Collapsing both into a single “N” means you’ve got a condition that doesn’t actually map to a single behavior. This is the same mistake we saw in the original shipping logic table, and it produces the same result: a combination that looks covered but isn’t.
Problem 2: Column 2 is wrong. Account not active, email matches, show contact-support message. But if the account doesn’t exist, the email can’t match anything. And if the account is locked, should the system confirm its existence to someone who got the email right? That’s a security decision that belongs in the spec, not the code. The tester assumed an answer rather than surfacing the question.
Problem 3: A whole column is missing. Active account, email doesn’t match. What happens? A user types in the wrong email address for an account they own, or guesses an address that belongs to someone else. The spec’s “generic message for security reasons” applies here — but this combination doesn’t appear anywhere in the table.
Problem 4: The conditions are underspecified. Two binary conditions (active Y/N, email matches Y/N) gives a theoretical maximum of four columns. The tester produced three, which means either one combination was eliminated intentionally (it wasn’t — there’s no documentation of why) or it was simply missed.
Here’s the corrected table:
╔══════════════════════════════╦═══╦═══╦═══╦═══╦═══╗
║ CONDITIONS                   ║ 1 ║ 2 ║ 3 ║ 4 ║ 5 ║
╠══════════════════════════════╬═══╬═══╬═══╬═══╬═══╣
║ Account status (A/L/X)       ║ A ║ A ║ L ║ L ║ X ║
║ Email matches?               ║ Y ║ N ║ Y ║ N ║ - ║
╠══════════════════════════════╬═══╬═══╬═══╬═══╬═══╣
║ Send reset link              ║ Y ║ N ║ N ║ N ║ N ║
║ Show contact-support message ║ N ║ N ║ Y ║ ? ║ N ║
║ Show generic message         ║ N ║ Y ║ N ║ ? ║ Y ║
╚══════════════════════════════╩═══╩═══╩═══╩═══╩═══╝
A = Active, L = Locked, X = Non-existent
- = Don’t care (non-existent accounts have no email to match)
? = Requirements gap — spec does not define this behavior
Five columns. Account status split into three explicit states. The don’t-care on column 5 is documented with a reason. Column 4 — locked account, wrong email — is marked with question marks and flagged for the product team: does confirming a locked account to someone with the wrong email create a security exposure? That’s not a testing question. It’s a product decision that the table made visible.
The difference between the two tables isn’t effort. The junior tester wasn’t being lazy — they thought carefully about three scenarios and wrote them down correctly. The difference is understanding that a decision table isn’t a list of test scenarios dressed up in a grid. It’s a complete enumeration of the logic space. Every condition needs distinct states, every combination needs a column, every blank action cell needs a resolution. When those rules aren’t followed, the table creates an illusion of coverage while leaving real gaps untested.

The Difference Between Coverage and Confidence
A lot of testing suffers from a particular kind of false confidence: the feeling that because you tested, you covered. You ran the happy path. You checked a few error conditions. Everything worked when you tried it, so the feature must be good.
Decision table testing replaces that feeling with something more reliable: demonstrable coverage. When you’ve built the table, eliminated impossibilities, merged equivalents, and derived a test case from every remaining column, you know the coverage is complete. Not because it felt thorough — because the table shows it. Anyone can look at the table and see which combinations were tested and which weren’t. When a bug surfaces in production, you can trace it back: was this combination in the table? Was it incorrectly marked as don’t-care? Was it a gap in the original conditions?
That accountability improves testing quality over time in a way that ad-hoc coverage never will.
Boundary value analysis tells you where to probe at the edges. Equivalence partitioning tells you how to group inputs sensibly. Decision tables tell you which combinations of conditions must be covered. All three working together — that’s a test suite that can genuinely be called systematic.
In our next article, we’ll explore State Transition Testing — the technique for software that changes behavior based on its current state. When the same input produces different outputs depending on what happened before, decision tables aren’t enough. You need to map the states.
Remember: The blank cell in your decision table is a requirements gap. Find it during planning, and it costs you five minutes. Find it in production, and it costs you weeks.